Staircase timer wiring: connecting a stair light with push-buttons
How a staircase timer lights a stairwell from any number of push-buttons and switches it off by itself: what is inside, its four terminals, why the buttons go in parallel, setting the time, and the wiring mistakes that leave the light dark or on for good.
Also in: Polski · Português (Brasil) · Deutsch

Transcript
Stair lights that you switch on with a push-button on any floor, and that switch themselves off a minute later. This is the staircase timer exercise in WireWhy's free course. The lamp must stay off until a button is pressed, light from either floor, and go off by itself.
The supply and a 16 amp breaker. Two push-buttons, one on each floor. They don't carry the lamp's current: a press only sends a signal. The staircase timer. It needs its own supply, L and N. A pulse on its S input starts it, and its Out contact switches the lamp for the set time, here 60 seconds. And the stair lamp.
The line into the breaker, and from the breaker to the timer's L. The timer's neutral straight from the supply. Each button gets the line from the breaker on its In terminal, and both Outs go to the timer's S. The buttons are in parallel: add as many floors as you like. The timer's Out feeds the lamp, and the lamp's neutral and earth go back to the supply.
Press the ground-floor button: the timer starts, and the lamp lights. The first-floor button does the same, and a press while it's on starts the minute again. Skip ahead to the end of the minute, and the lamp goes off by itself. Check my work presses each button and runs the clock on past the minute. All five goals pass.
Push-buttons only signal the timer through its S input. The timer's own contact switches the lamp, and any number of buttons can be wired in parallel. Try this exercise yourself, free and with no account, at wirewhy.com. The link is in the description.
A block of flats has a light on every landing of the stairwell and people on every floor who want it on. With two-way and intermediate switches you could give each floor its own switch, but the wiring grows with every floor, and the light stays on until somebody remembers to switch it off. The usual answer is a push-button on every landing and a staircase timer in the board: any button switches the light on, and the light switches itself off a minute or two later.
You can wire the same circuit on the canvas in the free exercise Staircase timer, which checks that the light comes on from either button and goes off by itself.
Names first
| Where | Name of the device |
|---|---|
| UK and IEC | Staircase timer, stair-light time switch |
| Poland | Automat schodowy |
| Germany | Treppenlichtzeitschalter, Treppenlichtautomat |
| Brazil | Minuteria |
The buttons are ordinary push-buttons with a normally-open contact: it closes while you hold the button and opens as soon as you let go.
Why a timer, and not two-way switching
Two-way and intermediate switching is the right answer for a hallway with two or three switches. In a stairwell with five floors it starts to hurt:
- Every extra floor needs another intermediate switch, with two travellers in and two out, and one swapped pair makes the light "work sometimes".
- The light goes off only when someone switches it off. In a shared stairwell nobody feels it is their job, so it burns all night.
A staircase timer fixes both:
- Any number of push-buttons, all wired in parallel. Each one needs only two wires: the line in, and the control wire out to the timer. Adding a floor means adding one more button to the same two wires.
- The light goes off by itself when the set time runs out.
- The buttons carry only a small control current. The lamps are switched by the timer's own contact in the board.
Across mainland Europe this is the standard way to light the stairs and corridors of a block of flats. In the UK and North America the same job is more often done with motion sensors or time-delay switches on each landing, but the timer and its push-buttons are a classic exam and training circuit everywhere.
What is inside
A staircase timer is a relay held by a timer. Its electronics watch the control input. When a button puts line voltage on it, the timer closes its output contact and starts counting. When the time is up, it opens the contact again.
Two details matter in use:
- A press while it is running starts the time over. Someone who presses again halfway up gets the full time again.
- Most DIN-rail timers have a selector: automatic, permanently on (for cleaning or carrying furniture), and on some, off. Many also offer a switch-off warning: the light flickers briefly, or dims, shortly before it goes off, so nobody is caught in the dark mid-flight.
The terminals
On WireWhy's canvas the timer has four terminals:
| Terminal | What it is for |
|---|---|
| L | Line from the circuit's MCB. It powers the timer and feeds its output contact. |
| N | Neutral. It powers the timer's electronics; without it, nothing happens when a button is pressed. |
| S | The control input from the push-buttons. On real timers it is often marked with a push-button symbol or a number such as 3. |
| Out | The switched line to the lamps. On the timer on the exercise's board, as on most real timers, it is marked with the lamp symbol ⊗. |
Each push-button has two terminals on the canvas, In and Out. Real devices differ in their markings, so always read the diagram printed on the timer.
Three-wire and four-wire connection
The connection in this article, with a separate control wire from the buttons to S and a separate lamp wire from Out, is the four-wire connection: line, neutral, the control wire and the lamp wire run up the stairs (plus the protective earth). Many timers also support a three-wire connection, found in older stairwells, where the buttons share a conductor with the lamps so one fewer runs up the stairs. Not every timer can do it, and it changes how illuminated buttons may be used, so check the device's diagram. WireWhy's timer and the exercise use the four-wire connection.
Illuminated push-buttons
Buttons with a small light in them, so you can find them in the dark, are common in stairwells. That light needs current all the time, and in the usual wiring it flows through the button's terminals into S even when nobody is pressing. One or two are fine. Too many, and the timer sees a permanent press: the light never goes off. Timer datasheets state how much of this current they accept, often as a maximum number of illuminated buttons. Beyond that, use buttons whose light has its own neutral terminal, as the datasheet describes.
Setting the time
The dial sets how long the light stays on after the last press, typically from about half a minute to several minutes. Walk the longest route the slowest way (someone carrying shopping to the top floor) and add a margin. Too short leaves people on a dark staircase between landings; too long wastes energy.
On the canvas, select the timer and set Time (s) in its settings. The exercise uses 60 seconds.
One more figure to check is the output contact's rating against the load. The contact switches the lamps' full current, and LED drivers draw a large inrush current for a moment at switch-on. Datasheets usually give a separate, lower limit for LED lamps than for incandescent ones.
Wiring it, step by step
This is the exercise's reference answer: a supply, a 16 A MCB, a push-button on the ground floor and another on the first floor, the timer, and the stair lamp.
- Supply L to the MCB's Line-In.
- MCB Line-Out to the timer's L.
- Supply N to the timer's N.
- MCB Line-Out to In on each push-button.
- Out of each push-button to the timer's S.
- Timer Out to the lamp's L.
- The lamp's N to the neutral, and its PE (for a class I fitting) to the protective earth.
Notice that no button is anywhere near the lamp. The buttons only put line voltage on S; the lamp hangs off the timer's output contact.
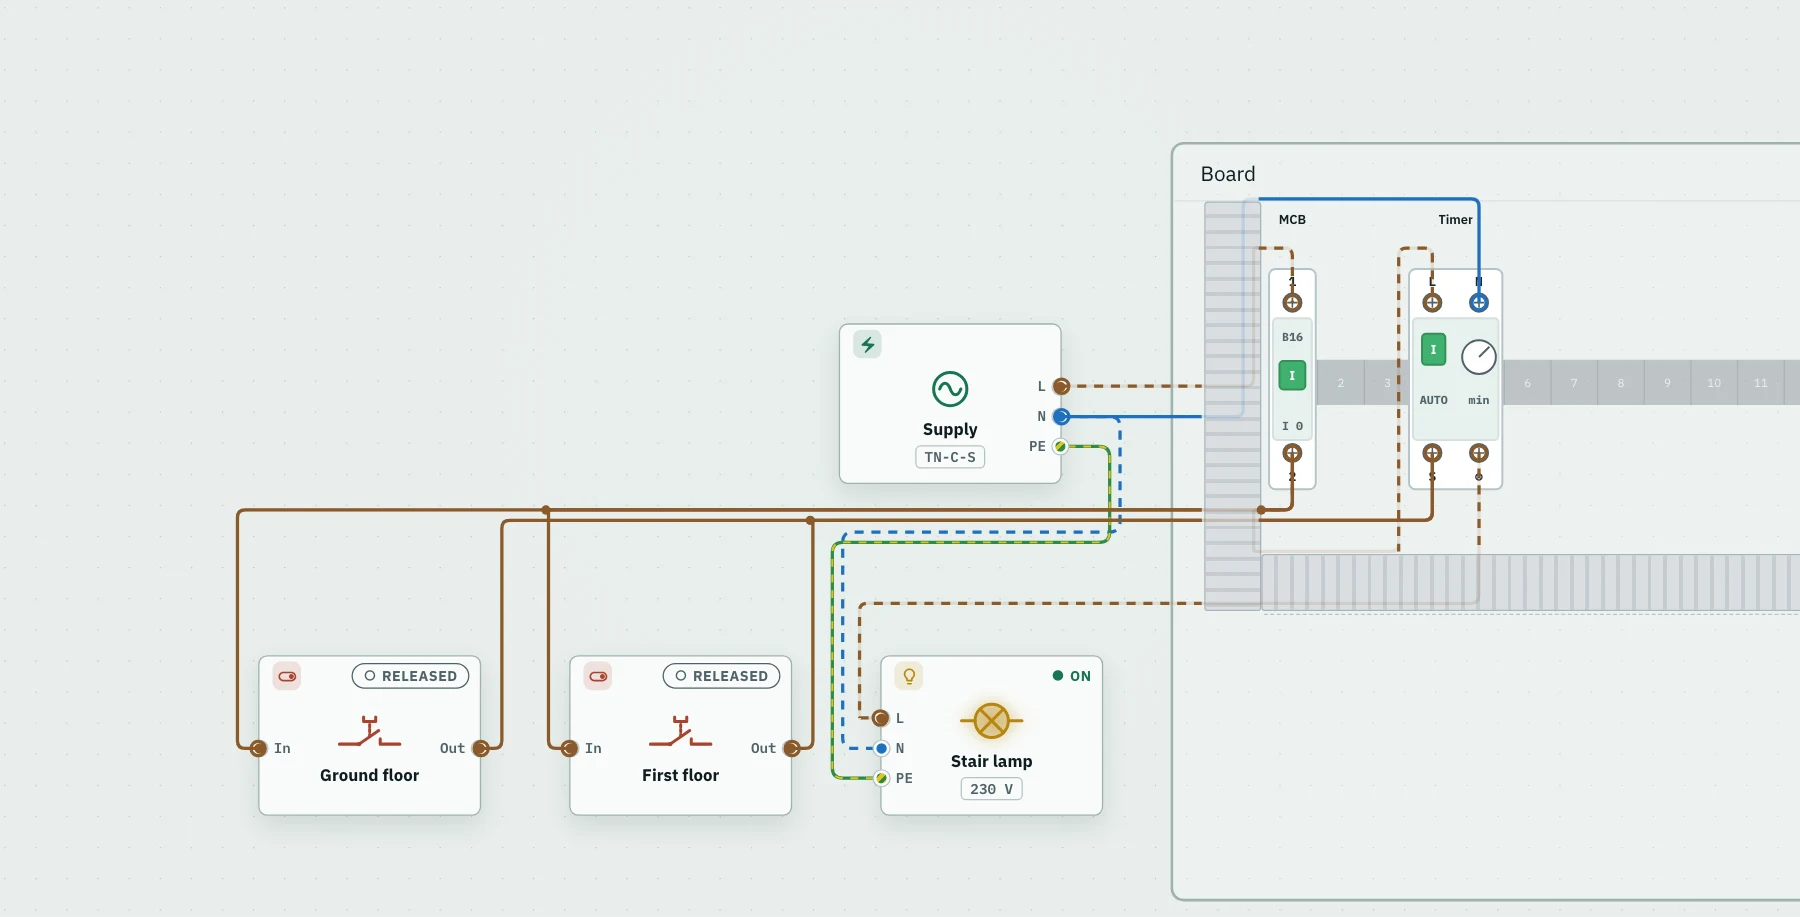
The exercise wired: both push-buttons take the line from the MCB and feed the timer's S input in parallel. A press on the ground floor closed the timer's contact, and the lamp stays on after the button was released.
Testing it
On the canvas, click the ground-floor button: the timer's contact closes and the lamp lights, and it stays lit after the button springs back. The first-floor button does the same, and a press while the light is on starts the time over. Use the time bar's Skip to the next event to jump to the end of the minute, and the lamp goes off by itself. Check my work runs four situations (nobody pressing anything, each button pressed and released, and 90 seconds after a press) and checks that nothing trips.
In a real stairwell the tests are the same, from every landing: each button lights the stairs, the time is right when timed with a watch, the permanent-on position works, and the light really goes off with all buttons released. That last test is the one illuminated buttons fail. Before any of that, with the circuit still isolated, come the usual dead tests: continuity of the protective conductors and insulation resistance, as described in Measuring an electrical installation.
The classic mistakes, and what the simulator shows
- Buttons in series. The line goes through the ground-floor button, then through the first-floor one, and only then to S. Now the light comes on only if both are held at the same time, which in a stairwell means never. On the canvas, pressing either button alone leaves S without voltage, the lamp stays dark, and the goals for each button fail. Push-buttons for a timer always go in parallel.
- A button wired straight to the lamp. The lamp lights only while the button is held, which is what you would get with no timer at all.
- The buttons on the neutral. The button then puts neutral on S, which never sees line voltage, and the light never comes on. As with any switch, the buttons work on the line conductor.
- The lamp on L instead of Out. It is on permanently, and the timer clicks away for nothing.
- No neutral to the timer. The timer has no power, so nothing happens when a button is pressed.
- A button between line and neutral. Wired like that, a press joins line and neutral directly: a short circuit, and the MCB trips. On the canvas, the goal "Nothing trips and no short circuit forms" fails.
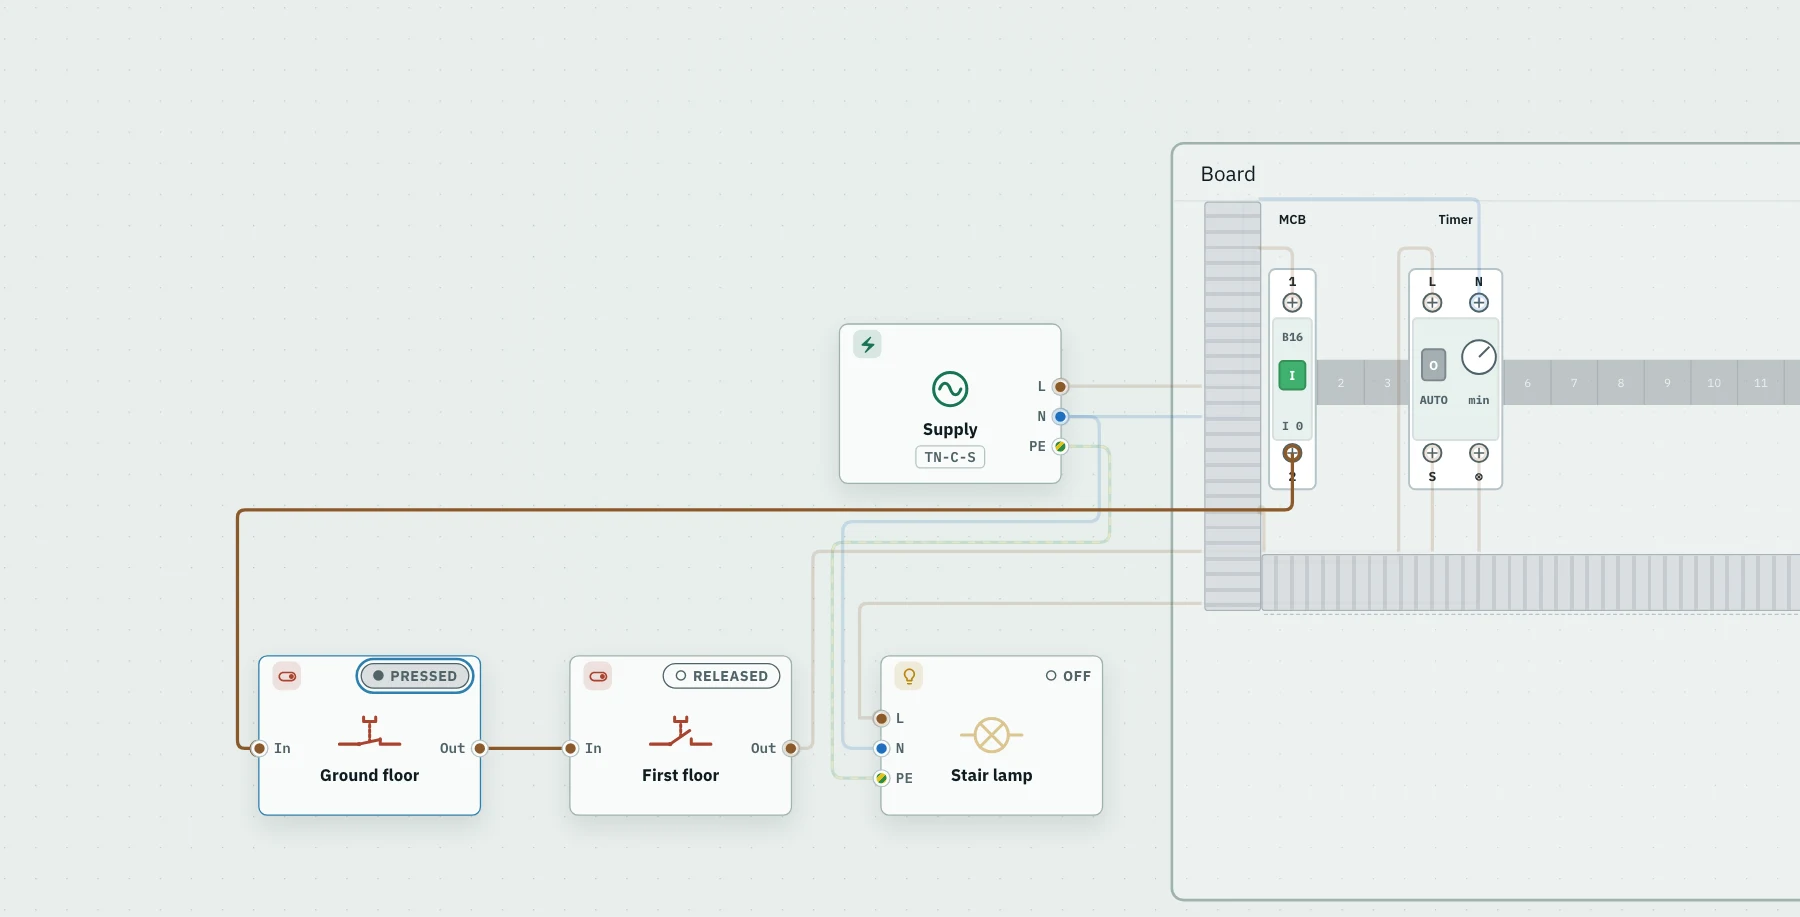
The classic mistake: the buttons in series. The ground-floor button is held, but the line stops at the open first-floor button, so S gets no voltage and the lamp stays dark.
After each attempt, What happened says which device did what and why, so a dark lamp is never just "it doesn't work".
A note on real installations
In a block of flats the stairwell lighting is usually fed from the building's common supply, from a board that belongs to the building rather than to any flat. Work on it is for the building's electrician, done with the circuit isolated, locked off and proven dead. The push-buttons are at mains voltage too, even though they look like bell pushes: a doorbell push made for a bell transformer's few volts is not a substitute for one rated for the installation. If the stairs stay dark, the method in The light won't come on works here too: measure at the timer's L, N and Out, and on S while a button is held.
Wire it yourself
The Staircase timer exercise is in Learn → Lighting control, after two-way switching and switching from three places. It is free and needs no account. Wire it, then break it on purpose: buttons in series, the lamp on L, no neutral to the timer, and read what happened each time.
Open the canvas at wirewhy.com/app to build your own version with a third or fourth floor: each one is just another button in parallel. For the switch-based way of lighting the same stairs, read Two-way and intermediate switching explained.
More from the same course: How to wire a light switch; How to wire a socket outlet; Does a metal light fitting need earthing?.